đŸ›Ąī¸Deadzone Configuration Tuner

Detect stick drift & calibrate your analog stick thresholds for maximum precision.

Plug in a controller & press any button...

🔧 Tuner Settings

Automatic Calibration

Leave sticks untouched. The tool will sample idle jitter and calculate your minimum threshold.

đŸ•šī¸ Left Stick

X:0.000 Y:0.000

đŸ•šī¸ Right Stick

X:0.000 Y:0.000

Dead Zone Test for Controllers: What It Is and How to Use It

What Is a Controller Dead Zone?

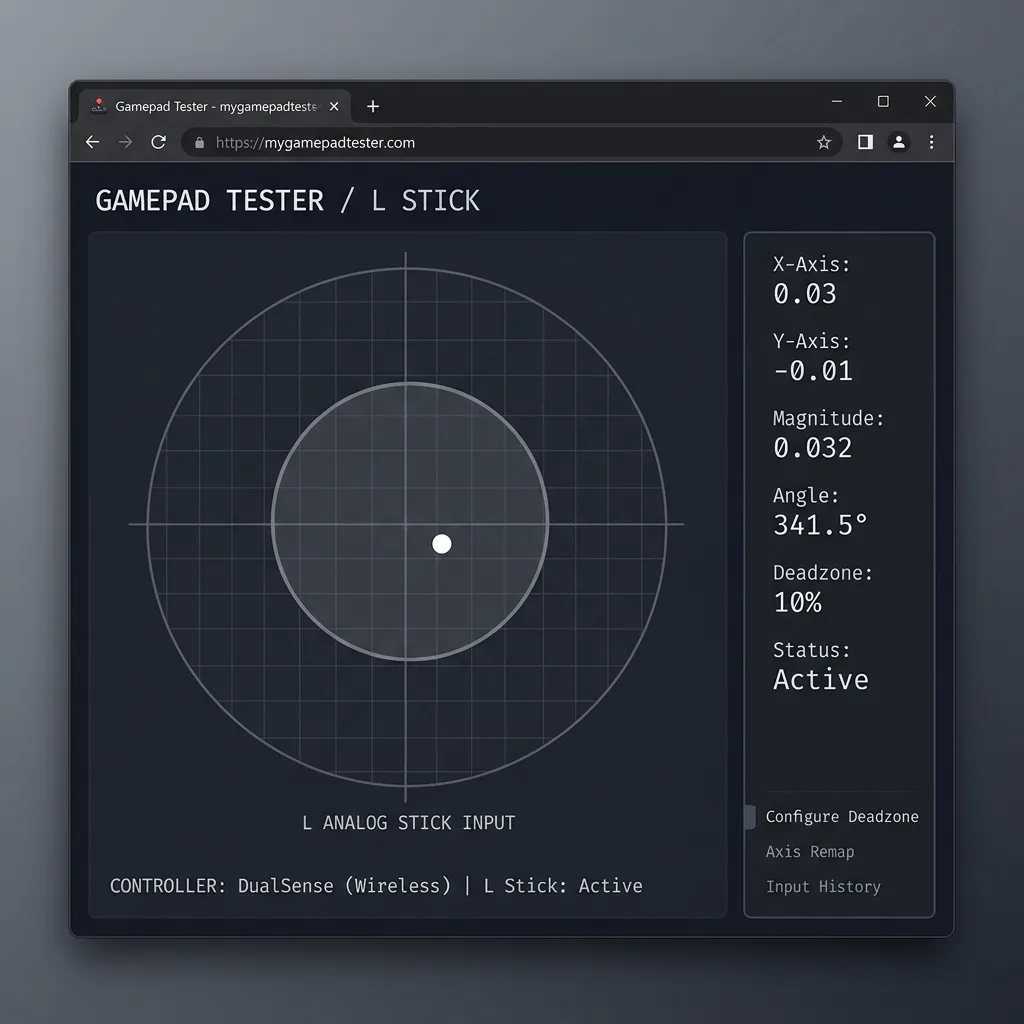
Every analog stick has a small area around its neutral position where movement is treated as zero. This area is called the dead zone. It exists because joystick sensors output tiny non-zero values at rest due to manufacturing tolerances, normal wear, or general electronic noise.

Without a dead zone, those idle values would register as constant unintended movement, making your character drift or your camera creep on its own. A radial deadzone treats the stick position as a circular vector, ignoring all movement inside a set magnitude.

Skip the guessing entirely. The free Deadzone Test at mygamepadtester.com gives you exact axis readings and a suggested deadzone value in under two minutes.

Diagram showing how controller dead zone threshold affects joystick input registration

Why Dead Zone Testing Matters for Gamers

Screenshot mockup of a dead zone test tool showing joystick position dot and deadzone ring overlay

Precision and Performance

In first-person shooters and racing games, precision is everything. A dead zone that is even slightly off can make aiming feel sluggish or cause unintended drift. A two-minute test tells you exactly where your controller stands.

For competitive players, dead zones directly affect reaction time. A smaller dead zone means the stick registers movement sooner, which can make a real difference in tournament play.

Use this data to measure your controller's input lag alongside your deadzone for a complete performance baseline.

How to Use the Deadzone Test: Step-by-Step

Follow these six steps at mygamepadtester.com to find your controller's exact noise floor and set a deadzone that stops drift without killing fine control.

1

Connect & Wake

Plug in via USB or Bluetooth. Press any button to wake the Gamepad API and identify your device.

2

Detect & Start

Click "Detect Controller" then "Start Test" to begin reading raw axis values in real-time.

3

Choose Your Mode

Select **Radial mode** for general use or **Per-Axis mode** for separate X/Y threshold analysis.

4

Sample Idle Jitter

Let the stick sit untouched for 60 seconds. Note any movement on the canvas without input.

Step-by-step infographic showing how to use an online dead zone test tool for game controllers at mygamepadtester.com

Key Features of the Deadzone Test

đŸ›Ąī¸

Radial vs Per-Axis

Treat stick position as a circular vector or handle X and Y independently for noisier sensors.

🧠

Auto-Suggest Logic

Our tool samples idle data while untouched and suggests a conservative threshold with a safety margin.

📈

CSV Exporting

Save time-stamped records of every sample for deep log analysis in Excel or Google Sheets.

What Your Results Mean

Color-coded deadzone value chart showing range from 0.00 minimal to above 0.20 significant controller wear

Interpreting the Data

A reading between 0.00 and 0.04 is minimal: your stick is in near-perfect condition. 0.05 to 0.12 is typical for a healthy controller with light electrical noise.

Readings above 0.20 point to significant wear. In these cases, the deadzone acts as a workaround for drift rather than a precision adjustment.

Running high? You should calibrate your joystick to verify full range accuracy.

Common Mistakes and How to Fix Them

Stacking Deadzone Layers

The most common mistake is having a deadzone active in your OS settings and another in-game. This compounds, making movement feel slow and sluggish.

Always check whether your game has its own deadzone slider and account for it separately. If drift persists in-game but looks clean in our test, the mismatch is likely in your software configuration.

Don't forget to test your triggers for response issues to ensure your entire input layer is optimized.

Illustration showing correct single-layer deadzone setup versus conflicting deadzone settings in game and Steam

Who Should Run This Test?

Competitive gamers, FPS players, speedrunners, and repair technicians get the most value from precise deadzone reading. It confirms whether stick drift is a hardware failure or a calibration shift.

FAQ Icon

Deadzone Test FAQ

The test reads raw axis values using the Gamepad API and identifies the maximum deviation from zero while the stick is untouched. It shows the minimum threshold needed to suppress idle jitter.

Aim for 0.00-0.04 if your controller is clean. If you see light jitter, 0.05-0.12 is typical and still responsive. Going above 0.12 may hurt your micro-adjustment precision.

Yes, but Bluetooth can introduce signal jitter. Always run a second test with a USB cable to see if the noise is coming from your connection or the hardware itself.

If the resting dot moves continuously without input, it's drift (sensor wear). If movement feels blocked at the outer edges, it's a deadzone limit. Our live readout makes this distinction clear.

The test shows raw hardware output. However, in-game settings will stack on top of system-level deadzones (like Steam's). Always set your main deadzone in one place to avoid 'muddy' movement.

The tool runs in any modern browser (Chrome/Edge/Safari). While consoles don't support browser Gamepad API, you can test your console controller on a PC or Mobile device with our site.

If movement feels slow or 'spongy' even when you push the stick firmly, your deadzone is likely too large. Lower it in 0.01 steps until movement feels snappy again.

Dial in Your Aim Today.

Stop guessing your sensitivity. Join thousands of performance-focused gamers at mygamepadtester.com and optimize your control logic with pinpoint accuracy.