What Is PS5 Stick Drift and Why Does It Happen

Stick drift on a PS5 DualSense controller means your analog sticks send movement signals to your console without you touching them. You will see a character walk on its own, a camera pan sideways, or a menu scroll endlessly. The PS5 reads this as a genuine directional input, and there is nothing in-game you can do to stop it mid-session. The cause is almost always mechanical: the internal components that read stick position have either worn down or been contaminated.
The DualSense uses potentiometer-based analog sticks. Each stick has two X/Y axes measured by small conductive wipers moving over a resistive pad. The position of those wipers creates a voltage difference that the PS5 translates into directional information. When the resistive track wears through, voltages no longer read correctly. Depending on how badly the track has eroded, your character might sit still at one moment and drift slowly toward doom the next. Research suggests roughly 40% of controllers show measurable drift after around 300 hours of gameplay, which is faster than most players expect.
How Potentiometers Cause Drift Over Time
The fundamental issue is that every time you tilt the stick, those conductive wipers physically scrape against the resistive pad. Over hundreds of hours, that friction erodes the pad surface. When parts of the resistive track develop deep scratches or wear through altogether, the voltage readings become inconsistent. The PS5 then translates an incorrect center reading as directional input, which shows up as drift. Hall effect sensor joysticks use magnets instead of wipers and are frictionless by design, which is why they last roughly ten times longer without drift. The stock joystick module has an inherently limited lifespan regardless of how carefully you treat the controller.
Other Causes: Debris, Firmware Bugs, and Hard Drops
Not every case of drift is caused by long-term wear. Debris including food particles, dust, and skin cells can accumulate in the gap between the analog stick base and the shell over time. Even though the internals are shielded, buildup on the surface can block the stick from returning to its neutral position, which registers as drift. A firmware bug or outdated software version can also cause ghost movement where the joystick appears to drift despite the hardware being undamaged. Finally, a bad fall onto a tile floor or excessive pressure applied during intense gameplay can compromise the structure of the cap and base, shifting how the stick reads its position. Routine cleaning is preventable maintenance that can delay drift significantly.
How to Confirm You Actually Have Stick Drift
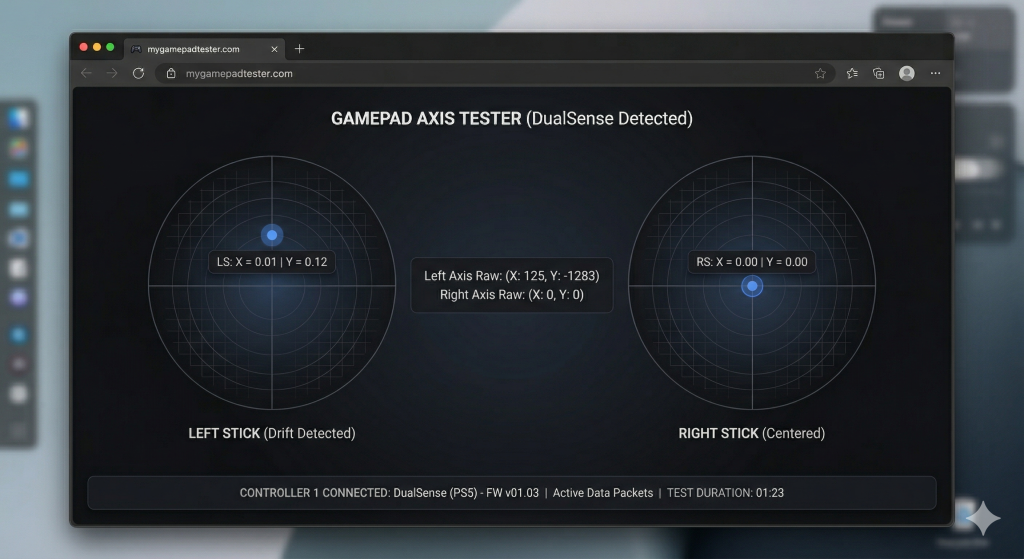
Before trying any fix, confirm that drift is actually the problem and not a software glitch, a game-specific issue, or normal stick travel. In-game testing is unreliable because many games hide minor drift by applying their own internal deadzone. You need raw hardware data, not an in-game observation. Connect your DualSense to a computer via USB or Bluetooth and use a browser-based tool to watch the live axis value readout for both sticks. If the numbers show movement, for example 0.08 or -0.12 on an axis, while you are not touching the sticks, you have a hardware problem. If the values stay at 0.00000 while stationary, the issue is software and a firmware update or reset will likely clear it. You can check your stick drift in real time this way without launching a game, which gives you an accurate starting point before you spend time on any repair method.
Software Test vs Hardware Test: Know the Difference
If the axis value reads 0.00000 while the controller sits idle, the hardware potentiometer is likely intact. The issue is probably a software glitch or a firmware inconsistency that a restart or reset will clear. If the axis value is moving on its own while you are not touching anything, you have genuine physical wear or debris inside the joystick module. Knowing which type of problem you have before you start lets you rule out software causes quickly and focus on the deadzone adjust or calibration fixes that actually match your situation.
Which Fix to Try First and Why
Start with the fastest, lowest-effort methods and work down in order of complexity. The most common cause of drift is dust and debris, so cleaning comes before any hardware repair. The recommended priority order is: restart and reset first, then clean around the stick base, then adjust the deadzone, then update firmware, then try browser-based calibration. Spending five minutes on a reset and a cotton swab before assuming your hardware is worn out will save the majority of users from unnecessary effort. Systematic troubleshooting can restore smooth functionality without any replacement needed in a large share of cases.
Fix 1 – Restart and Reset Your DualSense
The first step costs nothing and takes under two minutes. Restarting the PS5 resets any running processes and can clear a minor software fluke that is masquerading as hardware drift. Turn the PS5 fully off, wait 30 seconds, then turn it back on and retest the controller. If drift continues after a restart, perform a hard reset. Connect the DualSense to the console via USB cable, then use a paperclip or SIM eject tool to press and hold the small reset button in the back cover hole.
Hard Reset Using the Reset Button
- Turn off your PS5 completely, not just sleep mode.
- Locate the reset button on the back cover of the DualSense. It sits in a small hole near the center-right of the back panel.
- Insert a paperclip and hold the button down for 5 seconds. You will feel a small click.
- Disconnect the USB cable, wait 10 seconds, then reconnect.
- Turn on the PS5 and press the PlayStation button to pair the controller again.
- Retest on the PS5 dashboard. If the camera or cursor no longer moves on its own, the reset cleared the issue. Settings are reverted to factory defaults after this step.
Fix 2 – Clean Around the Stick Base Without Opening the Controller
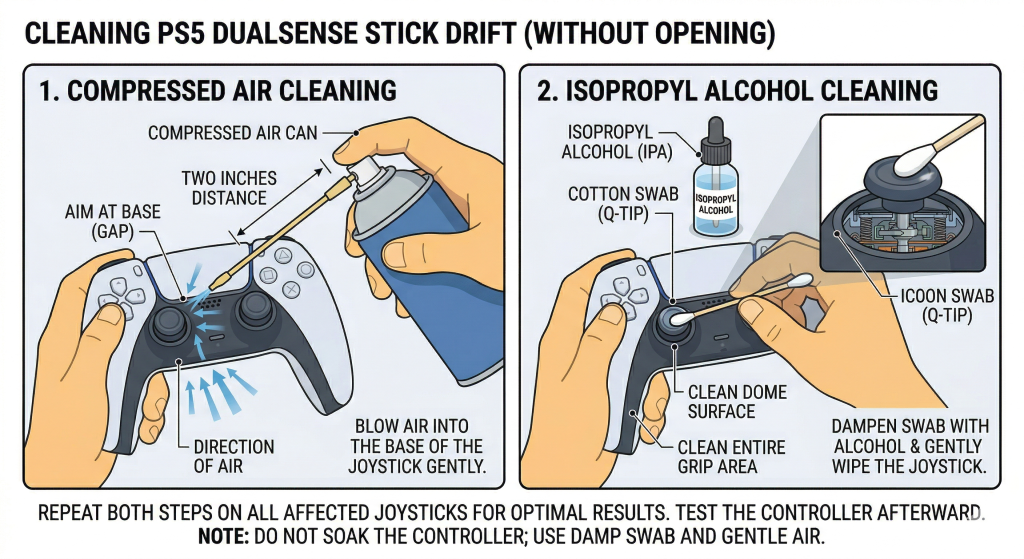
Dust, debris, and surface grime are the most common cause of drift in controllers that are not severely worn. You do not need to open the DualSense to clean effectively. Start by wiping the external casing with a damp cloth to remove any grime sitting near the base of the analog sticks. Then use compressed air or an isopropyl alcohol swab to target the gap at the base of each joystick. You can test your controller online after cleaning to see in real time whether the axis values have returned to zero without opening a game.
Compressed Air Method
- Hold the can of compressed air upright, about 2 to 3 inches from the base of the stick.
- Fire short bursts of air into the gap around the base where the stick meets the shell.
- Rotate the stick in a full circle while blowing to help dislodge debris from all angles.
- Repeat 3 times per stick. The entire process takes about 30 seconds per stick and requires no tools.
- Retest by watching the dashboard for unwanted movement or use a browser-based axis checker.
Isopropyl Alcohol Cotton Swab Method
- Dampen a cotton swab with isopropyl alcohol at 90% or higher. The swab should be damp, not soaking wet.
- Clean around the dome and cap of the joystick in a slow circular motion.
- Rotate the stick gently to help the alcohol reach the potentiometer contacts and remove corrosion or grime.
- Allow 5 minutes to dry completely before plugging in or testing. Never spray alcohol directly onto the controller.
- Repeat for both sticks and retest. If grime was blocking neutral return, the drift should clear after drying.
Fix 3 – The Pressure and Rotation Technique
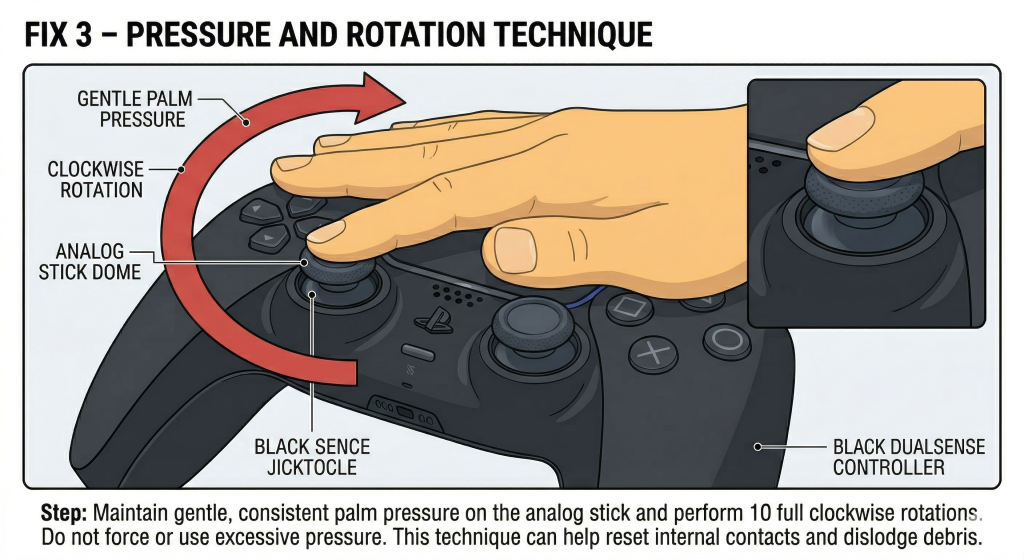
This method comes from real user reports on forums including Reddit and PushSquare, where players described clearing debris from inside the joystick mechanism without opening the controller. The idea is that gentle pressure combined with circular rotation physically dislodges internal debris that is preventing the analog stick from returning to its neutral contact point. Users who tried this reported short-term relief lasting from a few weeks to several months. It is not a permanent fix, but it works often enough to be worth trying before moving to software adjustments.
Step-by-Step Rotation Method
- Press your palm down on the affected analog stick just firmly enough to trigger the L3 or R3 click.
- While holding that pressure, rotate the stick clockwise in slow circles for 60 seconds.
- Switch to counterclockwise rotation for another 60 seconds at the same pressure.
- Increase pressure slightly, just a small amount more, and repeat two to three more rounds.
- Test on the PS5 dashboard by watching whether the camera or menu cursor still drifts.
- Confirm the result by watching the stick sit still on the home screen for 30 seconds with your hands off the controller.
Fix 4 – Adjust the Deadzone in PS5 Settings
A deadzone is the area around the center of the analog stick where the PS5 ignores input entirely. By default, the deadzone is small. Increasing it tells the PS5 to ignore any stick movement below a certain threshold, which effectively hides minor drift from reaching the game. This is not a hardware repair; it is a workaround. But for competitive players or anyone dealing with a small, consistent drift value, it can make gameplay fully usable again. Before you adjust, you can check your deadzone to measure exactly how far off-center the stick is reading, which helps you set the right deadzone value without guessing.
High sensitivity settings can actually intensify minor drift because smaller physical movements produce larger in-game outcomes. If your game has a dedicated controller section in its settings menu, check that too. Many titles like shooters and open-world games include per-game sensitivity and deadzone controls that can mask drift without affecting the PS5 system settings at all.
How to Change Deadzone on PS5
- Open Settings on your PS5.
- Select Accessories, then find DualSense Edge Wireless Controller. (Standard DualSense users can adjust per-game; system-level deadzone settings are an Edge exclusive.)
- Choose Custom Profiles, then Create Custom Profile and confirm with OK.
- Select Stick Sensitivity / Deadzone from the menu.
- Increase the deadzone value slightly and save.
- Test in the game where drift was most noticeable and adjust higher if drift persists.
- Check per-game controller settings as a separate step, especially in shooters and action games with a dedicated controller section.
Fix 5 – Update Your DualSense Firmware
Sony periodically rolls out firmware updates that address controller bugs, calibration inconsistencies, and input performance issues. A DualSense firmware bug can manifest as ghost movement that looks exactly like hardware drift. Updating is free, takes about five minutes, and requires only a USB cable. After updating, you can <a href=”mygamepadtester.com”>run a full controller diagnostic</a> to confirm all buttons, sticks, and triggers are responding correctly before returning to your game.
- Connect the DualSense to your PS5 using a USB cable.
- Open Settings, select Devices, then Controllers, then Update System Software.
- Accept the update if one is available and wait for it to complete.
- Update PS5 system software separately via Settings, System, System Software Update and Settings, then Update Using Internet.
- Check games where drift was noticeable: select the game, press Options, and choose Check for Update. Some games have their own input behavior tied to a specific game patch.
- Retest by watching the dashboard and axis readout for unwanted movement.
Fix 6 – Use Online Stick Calibration
Browser-based calibration lets you recalibrate the center point of your analog sticks without disassembly and at no cost. The method works by reading the current drift offset and saving a corrected center value. When the calibration completes, the drift values move toward zero on screen, which means the PS5 will interpret the stick’s idle position as neutral again. Connect your DualSense via Bluetooth or USB, open a compatible Chrome browser tool, leave the controller idle without touching the sticks, and watch the live axis readout adjust. A good joystick calibration tool also lets you adjust deadzone settings after cleaning or repair, so you get both confirmation and fine-tuning in one step. This method extends usable controller life and is completely free to use.
This is not a permanent fix when the hardware is badly worn. Calibrating a controller with severely damaged potentiometers can sometimes make drift worse, and there is no undo once new calibration data is saved. Use this method when drift is mild to moderate, not when the stick is wildly bouncing off-center. If calibration brings drift values close to zero and they stay there, the controller may be good for several more months of use before hardware replacement becomes necessary.
How to Confirm the Fix Worked
After completing any fix, check the result before going back into a game. On the PS5 dashboard, place both hands flat on your lap and watch the cursor or camera for 30 seconds. If neither moves, the fix likely worked. For a more precise confirmation, connect the DualSense to a browser-based tool and watch the live axis values. Good results look like this: both sticks show 0.00000 or values extremely close to zero while stationary, with no phantom movement in any direction. You can use a gamepad tester in your browser to check all inputs at once, including buttons and triggers, to make sure nothing else was disturbed during cleaning or disassembly. If drift is gone from the axis readout, the fix succeeded. If values are still moving on their own, move to the next fix in the priority order.
How Long These Fixes Last
The honest answer depends entirely on what caused the drift. If debris was the problem, cleaning can give you weeks to several months of clean performance. If the potentiometer is worn but not fully failed, deadzone adjustment and calibration can extend usable life for months, though drift will eventually return as wear continues. Users on NeoGAF and Reddit describe cleaning fixes lasting anywhere from a few days to over a year, with wide variance based on how much the controller is used.
Calibration is always a trade-off on worn hardware. It can reduce drift temporarily, but it can also make things worse if the track is badly eroded. There is no undo button once calibration data is saved. The only true permanent fix is replacing the joystick module, ideally with a Hall effect upgrade that is frictionless and lasts roughly ten times longer than the stock potentiometer design. Sony also covers joystick drift within the first 12 months of purchase through the standard warranty, which means a free replacement is often the right answer for controllers still inside that deadline.
When to Stop DIY and Get Professional Help
Clear signs that you should stop DIY repairs and contact Sony or a professional service include: drift returns within days after every cleaning attempt, both sticks are drifting severely at the same time, the controller was exposed to liquid, or you have already bent pins or solder joints attempting disassembly. Circuit board-level issues from liquid spills cannot be fixed by cleaning or calibration.
If your controller is under 12 months old, contact Sony customer support directly. The PS5 warranty covers joystick drift under normal usage and the replacement is free. If the warranty has expired, iFixit publishes a full teardown and joystick replacement guide that walks through the soldering process step by step. It is achievable even for a solder novice with the right tools. Professional repair shops like uBreakiFix offer controller repair without requiring you to void the warranty yourself. Consider upgrading to Hall effect replacement joysticks during any repair, since they eliminate friction-based wear entirely and will not drift the way potentiometer sticks do.
Frequently Asked Questions
-
Does stick drift mean my controller is broken?
Not necessarily. Stick drift is a sign of mechanical wear or debris inside the joystick module, but the controller is not completely dead. Most cases respond to cleaning, calibration, or deadzone adjustment. If the potentiometer is fully worn through, the controller needs a joystick module replacement, which is a repair, not a full replacement of the whole device.
-
Is stick drift covered by PS5 warranty?
Yes, Sony covers DualSense joystick drift within the first 12 months of purchase. The warranty applies to defects that cause drift under normal usage. File a claim directly through Sony’s support site and you will receive a replacement controller at no cost.
-
Will cleaning with isopropyl alcohol damage my DualSense?
No, as long as you use 90% concentration or higher and let the controller dry completely for at least 5 minutes before use. Never spray alcohol directly onto the controller. Apply it to a cotton swab first and clean around the base of the stick. Avoid 70% or lower concentrations because the higher water content can leave residue.
-
Does the deadzone fix actually stop stick drift?
It masks drift rather than repairing it. A larger deadzone tells the PS5 to ignore small stick movements below a set threshold, so minor drift never reaches the game. The underlying hardware issue remains. For small, consistent drift values, this workaround makes the controller fully playable. For severe drift that reads far off-center, the deadzone would need to be so large that normal stick movement becomes imprecise.
-
Can I fix drift without opening the controller?
Yes. Compressed air, isopropyl alcohol cleaning, the pressure and rotation technique, deadzone adjustment, firmware updates, and browser-based calibration all work without opening the controller. Opening is only required if you intend to apply contact cleaner directly to the internals or replace the joystick module.
-
How often do DualSense controllers develop stick drift?
Research data suggests roughly 40% of DualSense controllers exhibit measurable drift after approximately 300 hours of gameplay. Heavy daily use accelerates this. Players who use their controllers 3 to 4 hours a day are likely to notice drift within 3 to 6 months. Lighter casual use may extend the controller’s drift-free lifespan significantly.
-
Does contact cleaner permanently fix stick drift?
No. Contact cleaner like DeOxit removes corrosion and debris from the potentiometer contacts, which can stop drift caused by contamination. It does not repair physical wear on the resistive track. In many cases, cleaning buys weeks to months of clean performance before drift returns. It is a strong first-line repair, not a permanent one.
-
What is a Hall effect joystick and does it fix drift?
A Hall effect joystick uses a magnet and magnetic sensor instead of wipers on a resistive pad. Because there is no physical friction between moving parts, the sensor does not wear down the way a potentiometer does. This eliminates the most common cause of drift entirely. Hall effect replacements for the DualSense are available and require soldering to install, but they provide a lasting solution that potentiometer sticks cannot match.
-
Can stick drift get worse after cleaning?
Rarely from cleaning alone, but yes from calibration if the hardware is badly worn. Running recalibration on a severely damaged potentiometer can shift the mapped center point in a way that makes drift worse. Bent pins or disrupted solder joints from disassembly attempts can also worsen the problem. Stick to non-invasive fixes like compressed air and the cotton swab method if you are unsure about the condition of the internals.
-
Should I try all fixes before contacting Sony?
Try the reset, cleaning, and firmware update first since those take under 20 minutes combined and cost nothing. If those do not work and the controller is under 12 months old, contact Sony for a free warranty replacement rather than spending time on deeper fixes. Sony customer support handles drift claims as standard warranty cases and requires only basic evidence of the problem.

Controller hardware writer & gamepad diagnostics specialist