What Is Controller Deadzone and How Do You Test It?
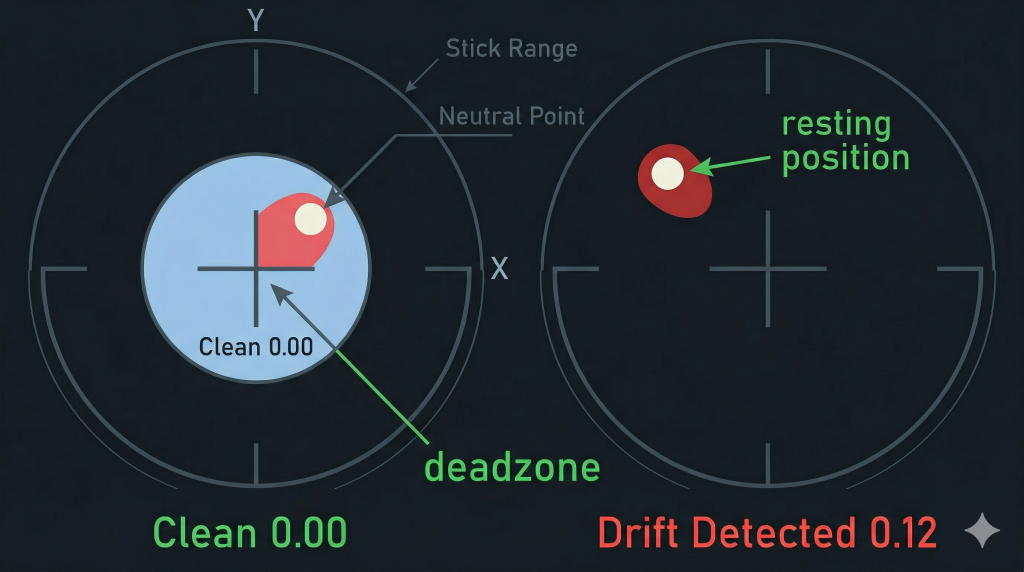
The deadzone on a controller is the area around the center of an analog stick where movement is intentionally ignored. When your stick rests at its neutral position, the sensor almost never reads a perfect zero. Tiny electrical fluctuations in the potentiometer or magnetic sensor can create a small, unintended output even when you are not touching anything. The deadzone is the defined region where all of those inputs are filtered out before they ever reach your game.
Every axis on an analog stick, the X axis for left and right and the Y axis for up and down, has its own deadzone threshold. The stick must move beyond that threshold before your game registers it as a directional input. This design exists because physical imprecision is unavoidable in mass-manufactured hardware, and fine control tasks like aiming in a first-person shooter or steering in a racing game would be ruined by constant micro-corrections from a stick that never truly sits still.
Why Every Controller Has a Deadzone Out of the Box
Every controller leaves the factory with a small built-in deadzone because mechanical tolerances are never perfect. Even a brand-new controller’s potentiometer produces a slightly offset resting voltage due to how the conductive wiper contacts the resistive pad. The deadzone absorbs that baseline fluctuation and gives the game a clean, stable zero to work from.
As controllers age, this protection becomes even more important. Dust, normal wear, and repeated physical impacts all contribute to jitter in the sensor readings. A default deadzone calibrated at the factory gives you consistent, neutral performance from day one, without any tuning required. Without it, even a fresh controller could register unintentional movement the moment you set it down.
The Difference Between Deadzone and Stick Drift
Stick drift and a deadzone problem are two separate things, and it matters that you distinguish them before you start changing settings. Drift is a hardware symptom, caused by a worn potentiometer where the resistive track has eroded and starts sending phantom axis values while the stick is idle. A deadzone is a software threshold that tells the system to ignore inputs below a certain level.
Increasing your deadzone can mask drift temporarily, making the offset value small enough to fall inside the ignored zone. This is a workaround, not a fix. If your axis value reads something like 0.08 or -0.12 while the stick is untouched, your hardware is sending ghost movement and the deadzone is the only thing standing between that and in-game chaos. As the potentiometer continues to degrade, drift values grow, the deadzone needed to hide them grows with it, and responsiveness suffers. If your deadzone adjustments keep failing to hold, you can read more about how deadzone adjustment can mask drift before hardware repair becomes necessary and what your realistic repair options look like.
How to Test Your Controller Deadzone Right Now
The most accurate way to measure your deadzone is with a browser-based tool that reads raw axis data directly from the Gamepad API, bypassing any in-game processing or filtering. You do not need to install anything. Before making any adjustments, you should check your deadzone with live axis readings so you know exactly what your sticks are doing before you change anything.
Step 1: Connect Your Controller
Plug your controller into your PC using a USB cable, or pair it via Bluetooth. Connect directly to a port on your machine rather than through a USB hub, which can cause unstable connections. Once connected on Windows or Mac, the XInput or HID driver installs automatically. If the browser does not detect the controller immediately, press any face button to wake the gamepad.
Step 2: Open the Deadzone Test Tool
Open your browser and navigate to mygamepadtester.com/deadzone-test. The page loads instantly and detects your controller automatically through the Gamepad API. No extension, plugin, or account is required. The tool is completely free to use.
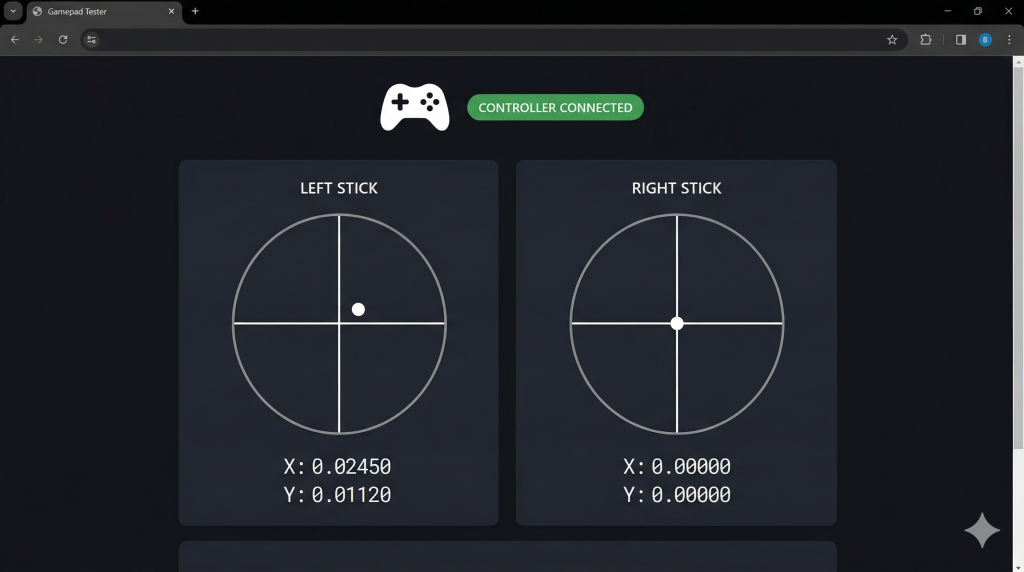
Step 3: Watch the Axis Readout While the Stick Is Untouched
Set the controller flat on a surface and place both hands on your lap. Watch the X and Y axis values for 30 seconds while you are not touching anything. If the numbers stay at or very near 0.00000, your stick is reading clean at rest. If numbers are moving on their own, you have phantom drift confirmed in raw hardware data.
Step 4: Move the Stick Through Its Full Range
Slowly push the stick to the north, south, east, west, and each diagonal corner. At each edge the axis value should reach or come very close to 100% of maximum output. Follow how the visual dot tracks across the display and note whether both the left and right sticks travel symmetrically through their full range.
Step 5: Read Your Results
If the stick shows a stationary offset value like 0.08 or -0.12, record which direction it pulls toward. If the range does not reach full output in one direction, that side is asymmetrically worn. If everything reads near zero at rest and reaches near 100% at the edges, your controller is in good shape. These numbers are the starting point for any adjustment that follows.
What Good and Bad Deadzone Test Results Look Like
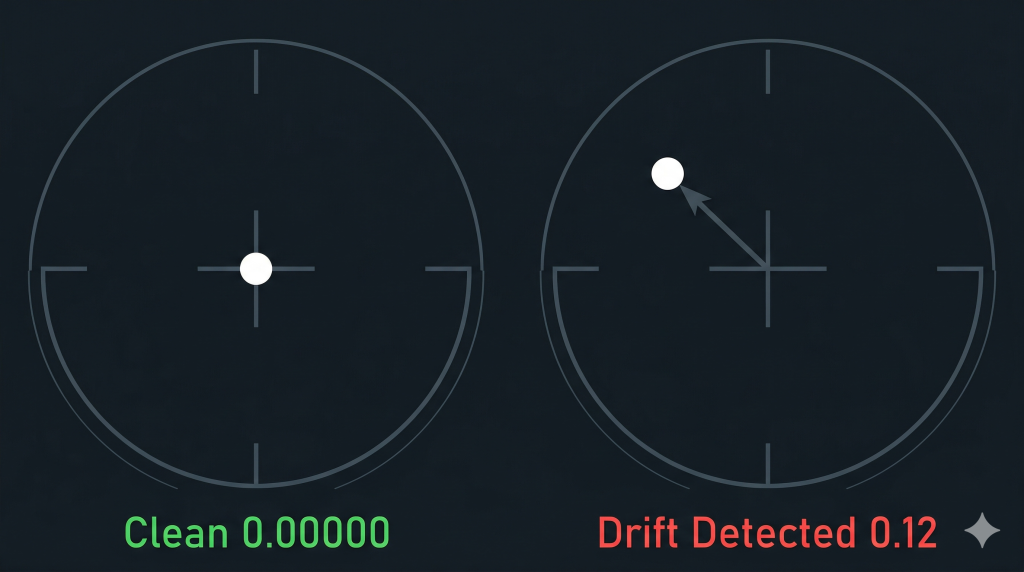
A clean result looks like this: both sticks read 0.00000 or values extremely close to zero while stationary, with no movement in any direction. When you push the stick to the edge, the axis value reaches near full output on all sides. Small jitter of 0.01 or less is acceptable and normal on any controller, including new ones.
A problem result looks like this: the axis shows values like 0.08, -0.12, or larger while the stick is untouched. The dot in the visual display drifts toward one edge even when your hands are off the controller. Or, when you push the stick toward one specific direction such as straight up, the output only reaches halfway rather than hitting 100%. That partial range means the mechanical gap at that point of the stick’s travel is too wide, and the contact is worn or obstructed. Either situation tells you clearly what action to take next.
How to Adjust Your Deadzone After Testing
Once you have a number from your test, you can make a targeted adjustment rather than guessing. The goal is to find the minimum threshold where drift disappears from gameplay without making the stick feel sluggish. After any change you make, use a joystick calibration tool in your browser to confirm the sticks are returning cleanly to center and that your adjustments took effect before launching a game.
Adjusting Deadzone in Steam
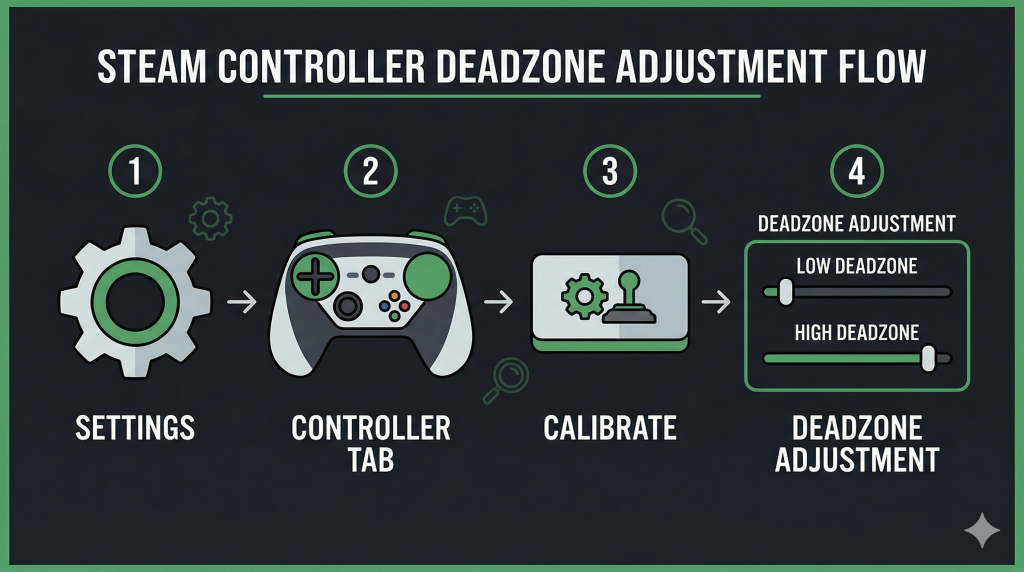
Open Steam and go to Settings, then Controller, then General Controller Settings. Select your controller from the list and click Calibrate. Use the left stick and right stick sliders to set the deadzone for each individually. To make this apply in a specific game, right-click the title in your Library, choose Manage, then Controller Configuration. Under Additional Settings, set Enable Deadzone to Calibration. Without that step, the global setting may not override the game’s own defaults even with Steam Input enabled.
Adjusting Deadzone in Windows Game Controllers
Open the Start menu and type Controllers, then select Set Up USB Controllers. Choose your device, click Properties, then go to the Settings tab. Click Reset to Default and confirm. This runs the Calibration Wizard built into Windows 10 and 11 and resets the XInput deadzone baseline quickly. It is a fast first step before reaching for more advanced per-game options.
Adjusting Deadzone In-Game
Most modern games with controller support include a dedicated deadzone slider in their options menu. In Rocket League, there are separate settings for controller deadzone and dodge deadzone. In Forza and other racing games, the trigger and stick deadzone are often listed separately. Start at the lowest possible value and slowly increase it until the on-screen drift stops. Save that profile and experiment for a session before locking it in, because what feels right in a menu can differ in fast gameplay.
The Right Deadzone Setting for Different Play Styles
Competitive players in FPS and shooter games should target the lowest deadzone that produces no drift. Even a fraction of a second saved by detecting smaller stick movements can affect aiming and reaction speed. For casual play in open-world or RPG titles, a slightly higher deadzone adds stability and reduces misfires from accidental stick nudges during relaxed sessions.
Racing games are a special case because both the analog stick and the trigger each have their own deadzone, and tuning them separately matters for consistent throttle and steering feel. The universal formula from TheGamingSetup holds: set the lowest possible deadzone without any drift, and plan to revisit it as the controller ages. You can test your controller online anytime to confirm your current reading is still within a comfortable range as your hardware wears.
How Long Deadzone Settings Stay Accurate
The honest answer is that deadzone settings are not set-and-forget. They are a temporary workaround for natural hardware wear. As the potentiometer continues to erode through use, drift values grow larger, and the deadzone you set today may no longer hide drift in weeks or months depending on how heavily you play. Users who game daily for 3 to 4 hours are likely to see settings slip within a few months. Research data suggests around 300 hours of total use is when measurable drift often appears on stock controllers, though this varies by brand and build quality.
Deadzone adjustment buys time, but it is a trade-off. A wider deadzone hides more drift but reduces the precision of your stick near the center, which shows up as a slight lag before movement registers. Hall effect magnetic joystick modules are the only hardware solution that removes this problem entirely, because they are frictionless and do not wear the same way potentiometer sticks do. If your deadzone settings keep needing to be wider every few weeks, that is a clear sign the hardware is the issue. You can read more about what your options are when deadzone adjustments no longer hold and whether cleaning, calibration, or a module replacement makes the most sense.
Frequently Asked Questions
What is deadzone in a controller?
Deadzone is the area around the center of an analog stick where movement is intentionally ignored before it reaches your game. Every controller has a small built-in deadzone to prevent unintended inputs caused by natural sensor imprecision. You can increase or decrease it depending on your controller’s condition and your play style.
Is a higher or lower deadzone better?
Neither is objectively better. A lower deadzone gives faster, more precise responses and is preferred by competitive players in shooters and racing games. A higher deadzone reduces unintended inputs and is useful if your controller shows mild drift. The right setting is the lowest value at which drift disappears entirely.
Can deadzone fix stick drift?
Deadzone can mask mild drift by telling the system to ignore small axis values near center. It does not repair the physical wear on the potentiometer that causes drift in the first place. If drift values grow past what the deadzone can absorb without making the stick unresponsive, hardware repair or replacement is the next step.
How do I know if my deadzone is too high?
If your character or camera takes noticeably longer to begin moving after you tilt the stick, or if small precise movements feel mushy and unregistered, your deadzone is too high. Run a browser-based axis test and note the stationary value, then reduce the deadzone until that value barely clears the drift threshold.
Does deadzone affect trigger inputs too?
Yes. Triggers have their own separate deadzone from the analog sticks. In games like racing titles or shooters, you can set trigger deadzone independently. DS4Windows and per-game settings in many titles allow you to tune L2 and R2 deadzone without affecting stick sensitivity.
Can I test deadzone without installing software?
Yes. Browser-based tools using the Gamepad API can read raw axis data without any installation. Connect your controller via USB or Bluetooth, open the tool in Chrome or a compatible browser, and the live readout starts automatically. No driver, plugin, or account is required.
What is anti-deadzone?
Anti-deadzone is an offset that sets the minimum output value the controller sends once the stick leaves the deadzone. It compensates for games that have their own internal deadzone built in. Without anti-deadzone, your stick has to clear both the hardware deadzone and the game’s own deadzone before movement registers, which creates a double-lag effect.
Does deadzone setting affect all games or just one?
It depends on where you set it. System-level settings in Windows Game Controllers and Steam’s global calibration can apply broadly, but individual games must have Steam Input enabled to respect those global values. Per-game settings in a game’s own options menu apply only to that title and override nothing outside it.
What is the default deadzone on Xbox and PS5 controllers?
Xbox controllers use a default XInput deadzone of around 25% (approximately 8,000 on the raw 32,768-unit scale). PS5 controllers are similar in range but the exact value varies by game since PlayStation does not expose a universal system-level deadzone slider the way Xbox and PC do. Games apply their own thresholds on top of hardware defaults.
When should I recalibrate instead of adjusting deadzone?
Recalibrate when the stick’s center point has shifted rather than when it is drifting during movement. If your test shows the resting value is consistently off-center but the stick moves symmetrically through its range, calibration can reset the neutral point and restore accuracy. If the drift value changes constantly or the range is uneven in one direction, the hardware is worn and calibration will only provide limited relief.

Controller hardware writer & gamepad diagnostics specialist