How to Connect Xbox Gamepad to PC – The Complete Guide (All Methods Covered)
So you picked up your Xbox controller, looked at your PC, and thought , “these two should be friends.” Good instinct. Connecting an Xbox gamepad to PC is one of the easiest things you’ll do in your gaming life. And yet, somehow, people still get stuck. Let’s fix that.
This guide covers every method clearly, with real steps and no fluff.
First, Know Which Xbox Controller You Have
Before anything else, you need to identify your controller. Microsoft has released several Xbox controller versions over the years, and they don’t all connect the same way.
Here’s a quick trick: look at the plastic around the Xbox (Guide) button. If the plastic around the Xbox button is part of the faceplate as one solid piece, your controller supports Bluetooth. If it’s a separate piece, it doesn’t.
Why does this matter? Because older Xbox One controllers lack Bluetooth entirely. They connect only via USB cable or the Xbox Wireless Adapter. Newer controllers , Xbox One S, Xbox Series X|S , support both Bluetooth and USB.
Knowing this saves you 20 minutes of confusion. Trust me.
Method 1: USB Cable (The Easiest Way)
Let’s start with the method that never fails. A wired connection is reliable, lag-free, and requires zero setup.
The easiest way to use an Xbox controller with a PC is via a cable. You simply plug your USB end into the PC and Windows should configure and recognize the device, allowing you to jump straight into a game.
Here’s what to do:
Step 1: Grab the right cable. Xbox Series X|S controllers use USB-C. Older Xbox One controllers use Micro-USB.
Step 2: Plug one end into your controller and the other into your PC.
Step 3: Windows detects it automatically. No driver installation needed on Windows 10 or 11.
That’s genuinely it. Just make sure the cable is rated for USB 3.0 and above, and try to pick a port on your PC that’s labeled USB 3 or higher. Cheap cables sometimes only carry power, not data , so if Windows doesn’t detect the controller, the cable might be the culprit.
Method 2: Bluetooth (Wireless & Clean)
No cables on your desk. No tangled mess. Just clean, wireless gaming , if your controller supports it.
To use Bluetooth to connect your Xbox controller to a PC, your computer must be running the Windows 10 Anniversary Update or later. Windows 11 works perfectly out of the box.
Here’s the step-by-step:
- Press the Xbox button to turn on your controller.
- Hold the Pair button (top of the controller) for three seconds. The Xbox button starts flashing.
- On your PC, go to Settings > Bluetooth & devices.
- Toggle Bluetooth on and click Add device.
- Select Xbox Wireless Controller from the list.
- When your controller connects successfully, the Xbox button stays lit.
The wireless range is decent too. Wireless controllers have a connectivity range of about 19–28 feet, so you can comfortably game from your couch without being tethered to your desk like a prisoner.
Method 3: Xbox Wireless Adapter (Best for Older Controllers)
If you have an older Xbox One controller without Bluetooth, or you want the most stable wireless connection possible, Microsoft’s Xbox Wireless Adapter is your answer.
You will need the official Microsoft Xbox Wireless Adapter for Windows 10, priced around $24.95 “price at the time blog writing” . Once you connect the dongle to your PC, simply hold down the pairing button on both devices and the controller automatically connects to your PC.
One cool bonus: the adapter can house up to eight controllers at once, and you can also use your Xbox headset alongside your controller. That’s great for local multiplayer setups.
After Connecting – Test Your Gamepad
This is the step most guides skip, and it really shouldn’t be.
Once your Xbox gamepad connects to PC, you should verify that every button, trigger, thumbstick, and vibration motor actually works. Not just assume it does.
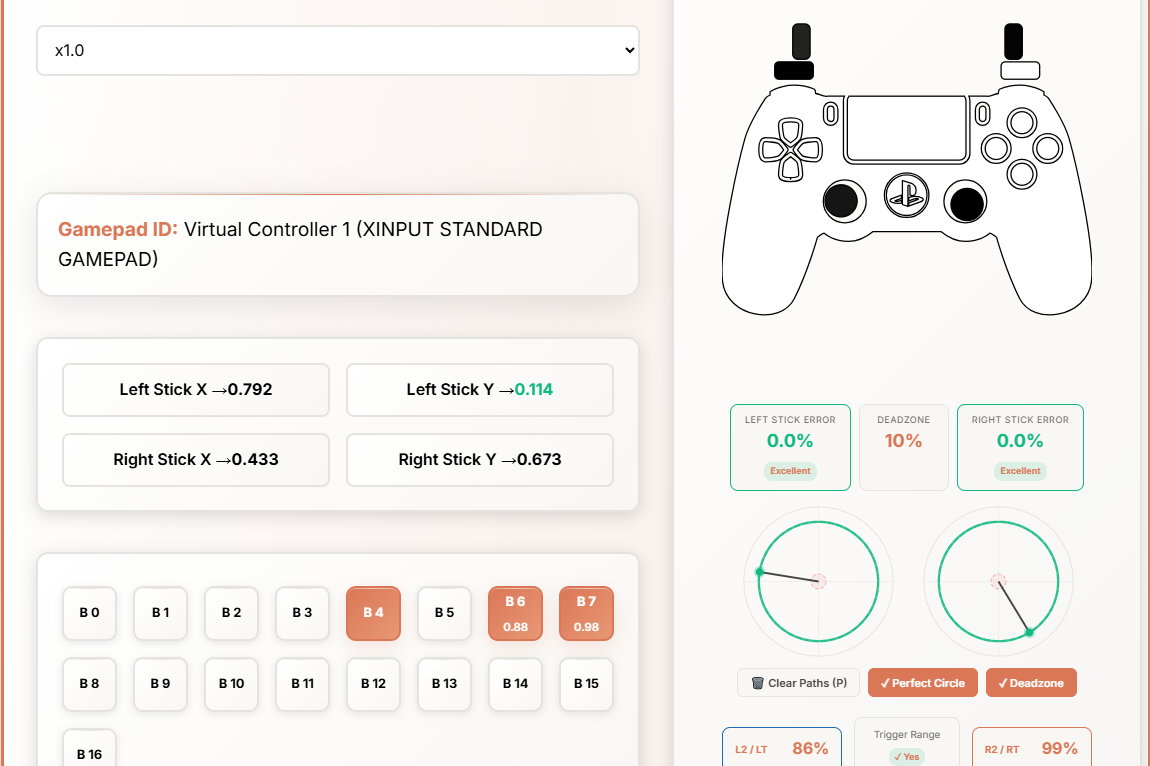
A practical way to do this is using a dedicated gamepad tester. MyGamepadTester.com is a free browser-based tool that lets you test your connected controller in real time , no downloads required. You can check button presses, analog stick movement, trigger sensitivity, and rumble all from one screen. It’s especially useful after reconnecting a controller or troubleshooting input issues.
Don’t skip this step. A controller that connects but has a sticky trigger or a drifting thumbstick is just a frustration waiting to happen mid-game.
Customize Your Controller with the Xbox Accessories App
Now that you’re connected and tested, let’s make it personal.
You can download the Xbox Accessories app from the Windows Store. It lets you assign buttons, swap triggers, disable vibration, and create custom profiles. The app also handles firmware updates for your controller.
Those who own the Xbox Elite Series 2 controller can manage all their profiles within the app. If you’ve spent money on an Elite controller, this is where you actually unlock its full value.
To update firmware, connect via USB cable first. Some users have reported issues updating over Bluetooth, so wired is the safer choice here.
Troubleshooting: When Things Don’t Work
Sometimes the connection just doesn’t happen. Here’s what to check:
Controller not detected via USB? Try a different USB port. Also check that the cable isn’t a charge-only cable – some Micro-USB cables are power-only and won’t transfer data.
Bluetooth pairing failing? Make sure your computer’s Bluetooth is turned on. Even if your controller is on, it won’t connect if Bluetooth is off on your PC.
Low or dead batteries? Make sure your device is fully charged. If the batteries in your controller are low or dead, you’ll need to replace or recharge them. Bluetooth connections especially suffer when battery is weak.
Controller appears in Device Manager but acts weird? You may need to manually install or update the driver by right-clicking the device in Device Manager and selecting Update Driver.
Nothing works? Restart your PC. It sounds like a joke, but it genuinely resolves a surprising number of Bluetooth pairing issues.
Which Connection Method Should You Choose?
Here’s a simple breakdown to help you decide:
USB Cable – Best for competitive gaming or when you want zero input lag. Also handy when your batteries die mid-session (we’ve all been there).
Bluetooth – Best for casual gaming from the couch. Clean setup, no dongles, works well for most games.
Xbox Wireless Adapter – Best if you have an older controller without Bluetooth, or if you’re setting up multiple controllers.
There’s no universally “best” option. It depends on your setup, your controller model, and how much you hate cable management.
My thoughts
Connecting an Xbox gamepad to PC has come a long way since the early days of manual driver configuration and hoping for the best. Before the Xbox 360 arrived in 2006, using a gamepad on PC was a pretty annoying experience — you had to manually configure buttons, and games wouldn’t detect the controller or show the correct icons. Those days are long gone.
Today, whether you go wired or wireless, Windows handles most of it for you. The key steps are: know your controller model, pick the right connection method, test it properly (use MyGamepadTester.com for that), and keep your firmware updated.
Now stop reading and start gaming.
Sources: Microsoft Windows Learning Center, Microsoft Windows Tips, PC Gamer, Digital Trends, Beebom